by Jeremy Richardson
Encoding Settings
When you want to import music from a CD to iTunes, there are a number of settings that can affect the audio quality and file size. Since Living Word messages are mostly spoken word, we can reduce the file size to a great degree without adversely affecting quality. This will allow you to fit hundreds if not thousands of messages on your phone or device.
- Open iTunes.
- Go to the menu iTunes > Preferences (Edit > Preferences for Windows users). This will open up the preferences box.
- With the General tab selected, click the Import Settings… button near the bottom.
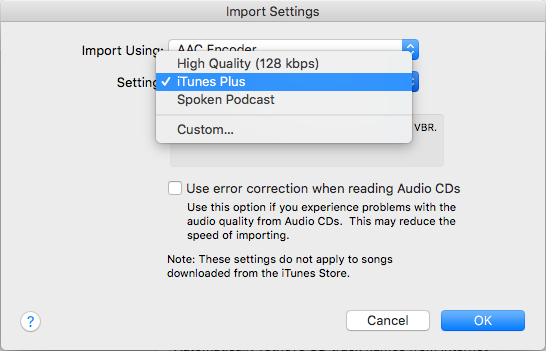
- Set Import Using to AAC Encoder.
- Click on the drop down next to Setting and select Custom…
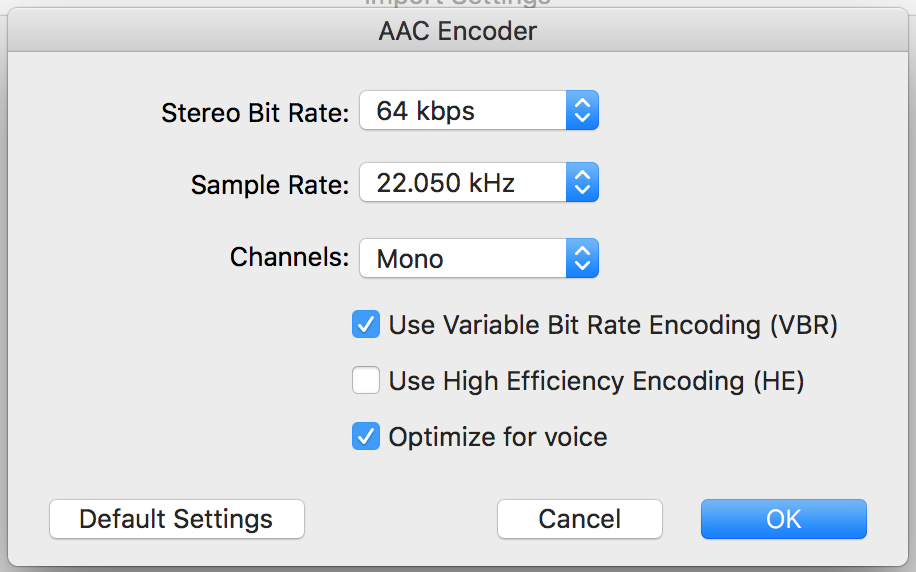
- In the settings box that pops up, set it to the following settings:
- Stereo Bit Rate: 64 kbps
- Sample Rate: 22.050 kHz
- Channels: Mono
- Use Variable Bit Rate Encoding: check
- Optimize for Voice: check
- Click ok 3 times to get back to your normal iTunes screen
Now every time you import a message, it will use these settings creating super small files allowing you to fit a huge number without taking up a huge amount of space!
If you are more audiophile minded you may want to tweak settings above such as increasing the bitrate, sample rate or make stereo. Do A/B tests with different settings to determine what is the best quality/file size balance for you.
Note: Next time you want to import a music CD into iTunes, you will want to change the import settings to something that is designed for music. We recommend iTunes Plus. Instead of Custom… on the Setting drop down in the import settings, choose iTunes Plus. You can change it back to Custom… next time you want to import a living word CD.
Note 2: We recommend you always keep the CD. The CD is the original master at the highest quality. If you were to ever lose data on your hard drive, you can always reimport CDs if you have them.
Organization
It isn’t always obvious how to name and organize your living word library because iTunes was designed for music albums. However, here is a methodology that could help you keep things in a manageable order.
- Import song names from the Internet – It’s fine if you leave this setting on but we may override information it imports (goto menu iTunes > Preferences… (Edit > Preferences for Windows users) and on the General tab there is a checkbox Automatically retrieve CD track names from the Internet).
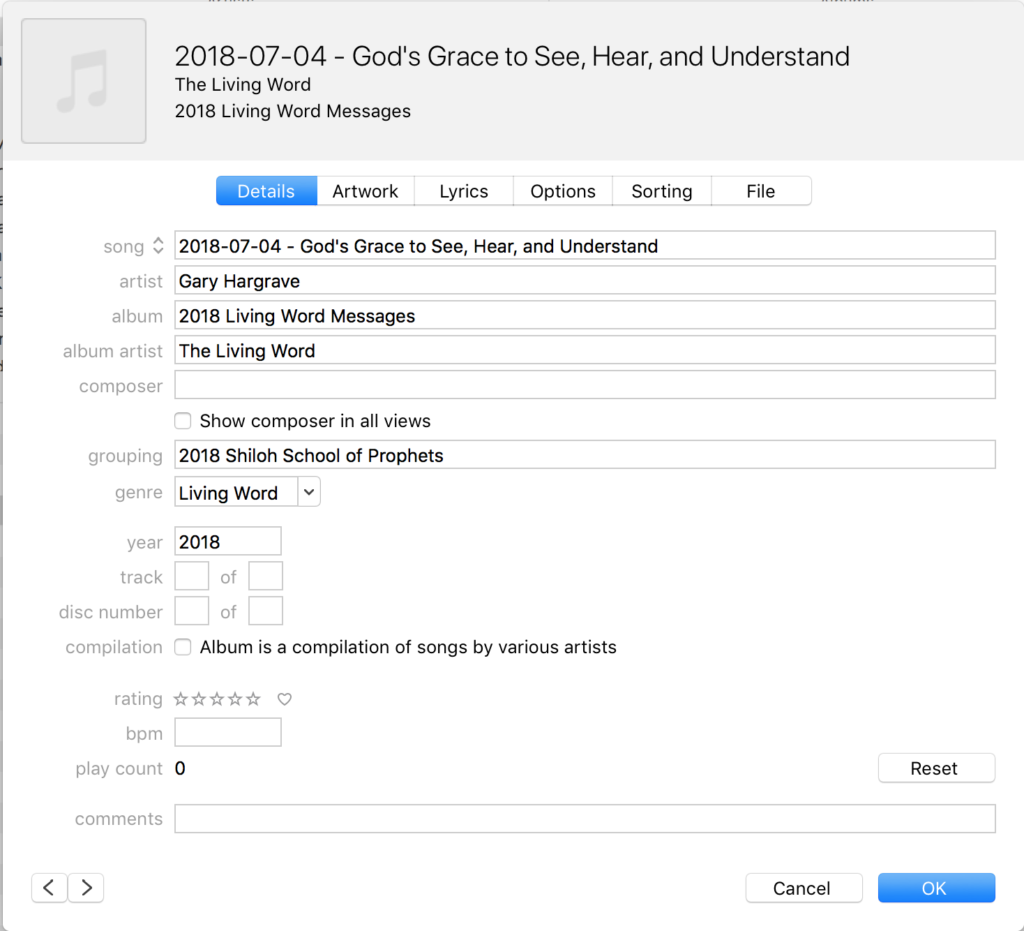
After importing a message, click on the track so it’s select and then go to the menu Edit > Song Info.
Here is a brief explanation of each field and what should to put into each:
- song – This should be the date and title of the message. The date should be in the format year-month-day in order for sorting to work, and the title in capital case (first letter of most words capitalized)
2018-07-03 Our Love Relationship With the Jewish People - artist – The title of speaker listed on the CD. If there is more than one speaker then separate them by commas.
Gary Hargrave, Silas Esteves - album – Each year of messages will be grouped into a single album for easy reference.
2018 Living Word Messages - album artist – This should always be “The Living Word.” That will allow us to group all Living Word messages together even when there are different people’s names in the artist field.
- grouping – This can be used to classify a series of messages.
2018 Shiloh School of Prophets, 2016 Feast of Tabernacles, Hidden Treasure - genre – Set to “Living Word.” Allows for grouping in custom playlists (to be covered later)
- year – The year the message was spoken.
2018 - track and disc number – These need to be cleared so there is no information in them. If you don’t it will impact sorting later and create confusing results.
- Options tab > Remember playback position – This tells iTunes to remember where you were last time you were listening. If you don’t check this, every time you listen to a message it will begin at the beginning.
That’s it! Creating a standardized method of cataloging your living word library will allow us to do some fancy things with Smart Playlists.
Smart Playlists
It’s always a great idea to keep up to date with the most current living word messages that are being released, but there is such a huge library of messages already available that it can almost seem overwhelming.
My answer is to use Smart Playlists to help me with what to listen to. This can be akin to the timeless method of closing your eyes and pointing to somewhere in Bible and reading what it says. But with Smart Playlists we can add another dimension to that method.
Create a new playlist in iTunes by going to the menu File > New > Smart Playlist… The following are suggestions for Smart Playlist settings.
All Living Word Messages
This playlist groups all living word messages together. You can then use the shuffle function to have it pick something randomly for you to listen to:
- Select Album Artist from the first drop down.
- Select Contains from the second drop down.
- Type in The Living Word in the text field.
All Living Word by Speaker
This playlist can group all living word messages by the speaker.
- Select Artist from the first drop down.
- Select Contains from the second drop down.
- Type in the name of the speaker you want to group by (eg. John Robert Stevens)
Living Word Messages by Month
Now we’re getting tricky. When listening to messages over time there is a consistent thread of topics and anointing at different times of the year. This will allow you to pick from all the messages of a specified month.
- Select Name from the first drop down.
- Select contains from the second drop down.
- Type in the number of the month with leading zero and dashes on either side (eg. -04-)
- Click the plus sign at the far right of the rule line to add another rule.
- Select Album Artist from the first drop down.
- Select contains from the second drop down.
- Type The Living Word in the text field.

Latest Living Word Added
This playlist helps give a short list of the most recent messages that you have imported into your library. Each line below relates to one rule.
- Select Album Artist from first drop down.
- Select is from second drop down.
- Type The Living Word in the text field.
- Check the box to the left of Limit to and enter 25 items (or however many you want to show) in the drop down beside.
- Select most recently added from the selected by drop down.
Least Played Living Word
This list will give you the messages that you have listened to the least.
- Select Album Artist from the first drop down.
- Select is from the second drop down.
- Type The Living Word in the text field.
- Check the box to the left of Limit to and enter 25 items (or however many you want to show) in the drop down beside.
- Select least often played from the selected by drop down.
Cloud Storage Methods
We have all become accustomed to our data being automatically synced to the cloud. Wouldn’t it be nice to be able to do that with your Living Word library?
There are many services that can sync audio files to the cloud – Dropbox, OneDrive, Google Drive, and many more. However, none of these have the ability to allow playback through the Apple Music app on your phone.
If you want to sync your iPhone with your iTunes library using the cloud, you will need to subscribe to Apple Music ($4.99/mo student, $9.99/mo individual, $14.99/mo family).
Apple gives you 5GB free cloud storage with your basic iTunes account. If you run out of storage you will need to purchase more by subscribing to Apple’s iCloud storage. For $0.99/month you get 50GB of storage which should be plenty for your Living Word library if you use our suggested compression settings.
If you don’t want to subscribe to a cloud service, syncing through a cable directly with your computer works fine.